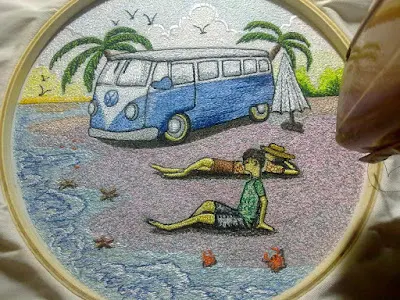
JavaHarmony.com-Embroidery painting is an art that combines the art of painting with the art of embroidery. The process combines visual aesthetics with the skill of operating a manual embroidery machine, creating stunning end results. One way to create beautiful embroidery paintings is by using a manual embroidery machine from the Juki brand. Juki machines are one of the leading brands in the sewing world, ranging from the purely manual ones to their state-of-the-art computerized technology. Many embroidery artisans in Indonesia still use manual embroidery machines, commonly referred to as Juki machines (although the brand may vary). Creating embroidery paintings with a Juki embroidery machine becomes easier and faster.
Step 1: Prepare the Necessary Materials and Tools
Before you begin creating an embroidery painting, make sure you have all the required materials and tools. You will need fabric or canvas as your painting medium, embroidery thread, a hoop, a Juki embroidery machine already fitted with an embroidery needle, and the image or design you intend to embroider.
Step 2: Choose the Design to Embroider
Select the design you wish to embroider. You can use your own design or download an embroidery pattern from the internet. Ensure that the design is suitable for the size of the medium you will be using. You can either sketch it directly on the canvas using a pencil or trace the image using carbon paper.
Step 3: Prepare the Juki Machine
Install the embroidery needle on the Juki embroidery machine. Make sure the embroidery thread you've chosen matches the color you desire for the embroidery. Also, adjust the thread speed and tension to your embroidery preferences.
Step 4: Prepare the Embroidery Painting Medium
Secure the fabric or canvas onto the hoop frame. Ensure your painting medium is even and taut, so that the embroidery results will look better.
Step 5: Begin Embroidering
Start by applying the base color to areas with more dominant colors.
Whenever you change the thread color, remember to clean the remaining thread on the back. Stacked and untidy lower threads can cause issues with the machine's gears and may lead to the embroidery needle breaking.
Start adding the details:
- I usually write the name and the creation date in the bottom right corner. Even though embroidery paintings are not easy to duplicate by others, I still feel it's necessary to include my name in my works.
- Attach a layer of sponge/corduroy at the back to cover the back threads for a neater finish. This sponge serves a crucial function in enhancing the three-dimensional effect on certain parts of the painting. Choose the object you want to emphasize and embroider along the object's edge lines together with its sponge layer.
- For easier maintenance, we add a fabric and sew it into a sleeve to insert an elastic cord. This way, the embroidery painting can be easily removed and reattached to its frame. So, if the painting gets very dirty, you can wash it and let it dry. After washing, you can also iron the painting by removing or cutting the sleeve cord first. After ironing, the elastic cord (or other cord) can be reattached with the help of a pin attached to one end of the cord when inserting it into the sleeve.
The embroidered painting is ready to be hung on the wall by hooking it onto a nail in the screw slot on the hoop.
Creating an embroidered painting using a manual embroidery machine like the Juki brand is an enjoyable and creative way to combine the art of painting with the art of embroidery. With a reliable Juki machine, you can create beautiful and detailed embroidered paintings. So, if you have a passion for fabric crafts, try using a Juki machine to create stunning embroidered artwork.


Posting Komentar
Silakan Meninggalkan Komentar